On-Site (Clock In/Out) Timesheets

Clocking In and Out

There are two ways to clock in and out based on your timesheet type. If you have the timesheet type…

  • Online or remotely (Manual/Duration)
  • On-Site (Clock In/Out)

Online or remotely (Manual/Duration)

Online or remotely (Manual/Duration) timesheet type users can enter time in three ways: week view, day view, and clock in/out view. Clocking in and out is optional for these users. However, they can clock in and out by following the steps below:

Note: This applies to users with the Timesheet Type set to Online (Manual/Duration) in their profile.

1. From the week view, switch to clock in/out view by clicking the date and selecting Clock In/Out View.
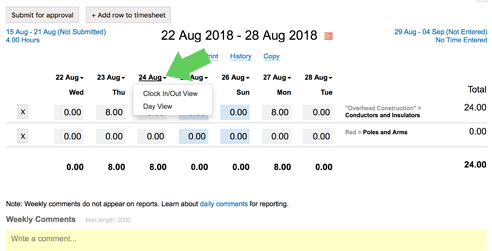
switch to clock in out

2. Click Add a task then complete the form.
clock in task

Note: This action will override any time you entered for the day using the day or week views. On-Site (Clock In/Out) type timesheet type are required to clock in and out from the main login screen. Users are allowed to view the current day and week total hours upon logging in using a special PIN. These users are not allowed pass the clock in/out screens. For example, they cannot run reports or view leave balances. These users do not submit timesheets.

On-Site (Clock In/Out)

Note: This applies to users with the Timesheet Type set to On-Site (Clock In/Out) in their profile.

On-Site timesheet users follow the steps below to clock in and out:

1. From the tablet or device that you wish for people to use to clock in and out, an administrator should first enable quick clock in/out by turning on the setting under Settings -> Timesheets -> Quick clock in/out on this device.

2. Click the clock icon at the bottom of the login screen to switch to the clock in/out form.
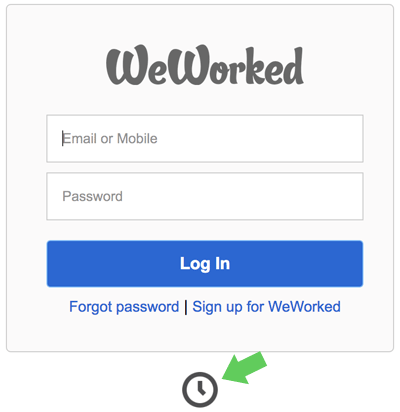
switch to clock in out

3. Enter your PIN and either clock in or out. If an administrator did not assign you a default task, you will be required to select a task before clocking in.
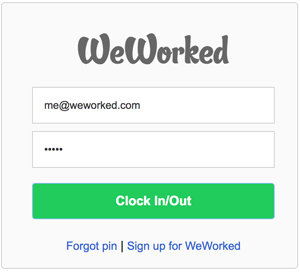
enter pin to clock in

Note: You will have to enter your email or mobile number and PIN if the device is not enabled for quick clock in/out. If you receive a message “you are not authorized to clock in/out from this device” an administrator needs to enable the setting that allows you to clock in and out from anywhere. Administrators will find this setting under your profile.

Timesheet Types

Timesheets in WeWorked are controlled by the timesheet type selected in a user’s profile. Time in worked is captured in two ways:

  • Online or remotely (Duration) – entering the overall time spent on a task. For example, 2 hours in a meeting.
  • On-Site (Clock In and Out) – capturing the specific start and end times of a task. For example, in a meeting from 02:00 to 04:00.

Online or remotely (Duration)

Duration is the default timesheet type in WeWorked. Select this timesheet type when your main focus is to capture the overall time worked on a task. Duration is the most flexible timesheet type. Users log into WeWorked.com or the mobile app to adjust their timesheets. Users can still add clock in and out times, if required. The duration will automatically adjust based on the start and time entered. Note that clock in and out entries will override any duration entries. Once a clock in and out entry is entered for a day, duration cannot be adjusted for that day.

On-Site (Clock In and Out)

The On-Site (Clock In and Out) timesheet type is only for capturing the actual start and end times of a task. It is far more restrictive than the Duration timesheet type. Users with this timesheet type do not log into WeWorked. They simply clock in and out from a single screen. These users are not allowed pass the clock in/out screens. For example, they cannot run reports or view leave balances. These users do not submit timesheets.

Options for Clock In and Out

Handling time after midnight – automatically split timesheets that cross over midnight so that hours after midnight are added to the next day. If turned off, the time that crosses is applied to the same day (the day clocked in). An administrator can control this under Settings -> Timesheets -> Split timesheets at midnight.

Default Task

A default task can be assigned to a user that clocks in and out, or they can be allowed to select a task at the time of clocking in. Turn this option on and off from a user’s profile. Select or deselect the Allow Task Selection option.

Setting Up a Default Task

Administrators can setup a default task under Settings -> Timesheet. The default task will apply to all users that clock in and out and have Allow Task Selection disabled.

Clock In and Out from Anywhere

Users can be limited to clocking in and out from specific devices (computers, iPads), or they can be allowed to clock in and out from any device. Turn this option on and off from a user’s profile. Select or deselect the Allow Remote Access option.

Setting up a Device for Clock In and Out

From the device they want people to clock in and out from, an administrator can allow clocking in and out from a device under Settings ->Timesheets -> Quick Clock In/Out on this device. This will allow all the users that are not allowed to clock in and out from anywhere to clock in and out on the device.

Task Timer

WeWorked has a built in task timer to help you keep track of the time you spend on individual tasks. You can start and stop the timer whenever you like. The timer will also add recorded time to the time you previously entered. All the math is done for you automatically.

To use the timer, switch to the daily view screen.

switch-daily-view

Then click the timer icon beside the task you want the timer to keep track off. You must add the task to the timesheet before you can start using the timer. The timer will start automatically.

task timer

Once you finished working on the task, click Add Time to Task. Your changes are automatically saved and the new time is added to any existing time.

save task timer

You must keep the timer screen window open for the timer to work. Just open another tab in your browser if you need to do other things.

Daily Comments

Entering Daily Comments
These comments relate to a specific time entry and task. Switch to Daily View then click Edit Detail, enter your comments, then click Save Details.

Note: To make it easy to spot detailed comments, a small bar will appear under the time entry that has a detailed comment.

Timesheet Day View

You can view a single day at a time. As you are working and adjusting your time in WeWorked you can more easily stay focused on the current day. But of course you can switch back and forth between views.

Note: You can add a new task in Daily View, but deleting tasks and approving or denying time is limited to the week view.

Switching to day view
There are two ways to switch to day view: 1) click on the date 2) click on the Day View link.

Returning to week view
Simply click Week View above your timesheet.

Reviewing Timesheets

You can only review time for the users for which you have rights to review. The review link will display No Time Pending or Review Pending (means there is time for you to review). Click the link in the dashboard.

timesheet dashboard

The review area will default the time period to the previous 30 days and weekly pending time. Adjust your filters as needed then click View Timesheets. You can then click on the row of the results to jump to a person’s timesheet to take action (such as approve or deny time) on their timesheet. The results will only include users that you can review.

Review Options

You have two options when reviewing timesheets: 1) Quick Review or 2) Detailed Review. Quick Review allows you to approve or deny timesheets from a single screen without having to enter each user’s timesheet. From the review area, click on a row with pending time to display the task details and review options. Choose to Approve or Deny.

Use the Detailed Review option when you need to view a person’s entire timesheet, looking for items like weekly and daily comments and leave approvals. From the review area, on a row with pending time, click the name of the person to enter their timesheet. You can also click on the row then the specific date to jump to the person’s timesheet with the date.

Approving Timesheets

Go into the timesheet that has time pending approval and click Approve right below the dashboard. You will see one or more of the following options:

  • This Week – displays when all the days of the week are in a status of Pending Review.
  • This Week and Next Week – displays when all the days of the week and the next week are in a status of Pending Review.
  • Last Week and This Week – displays when all the days of the week and the previous week are in a status of Pending Review.
  • Semi-Monthly – displays when all the days between the 1st and 15th or 16th and end of month are in a status of Pending Review. The first day of the week will determine which period displays. Ex. To approve the 16th through the end of the month, the first day of the week must fall on or after the 16th.
  • Select Days – displays for all the available days that are in a status of Pending Review.

Denying Timesheets

Go into the timesheet that is pending approval and click Deny right below the dashboard. You will see one or more of the following options:

  • This Week – displays when all the days of the week are in a status of Pending Review or Approved.
  • This Week and Next Week – displays when all the days of the week and the next week are in a status of Pending Review or Approved.
  • Last Week and This Week – displays when all the days of the week and the previous week are in a status of Pending Review or Approved.
  • Semi-Monthly – displays when all the days between the 1st and 15th or 16th and end of month are in a status of Pending Review or Approved. The first day of the week will determine which period displays. Ex. To approve the 16th through the end of the month, the first day of the week must fall on or after the 16th.
  • Select Days – displays for all the available days that are in a status of Pending Review or Approved

Type why you are denying the timesheet then click Deny Timesheet. An email with the comment entered will go to the person whose timesheet is getting denied.

deny timesheet

Completing timesheets

You can access your timesheet by clicking Timesheet under your name in the Dashboard.  

Entering Time

You enter time in WeWorked according to task.  Each row on the timesheet represents a task.  Before you can start entering time, you must first add a row to your timesheet.

Time Format

You can enter time in two ways: Time Format (9:45) or Decimal Format (9:75). WeWorked always displays time in decimal format. If you enter time in time format, WeWorked will automatically convert it to decimal format. You can also just enter decimal format. Decimal format is calculated by dividing the minutes by 60. For example, 1 hr and 50 min is 1.83, which is 50/60 = .83 for the minutes.

Example time entries:

Description Time Format Decimal Format
1 hr 15 min 1:15 1.25
2 hr 30 min 2:30 2.50
3 hr 45 min 3:45 3.75

Adding a Row

If no rows have been added to the timesheet, click Add a row in the middle of the timesheet. add timesheet row

If you already have a row on the timesheet, click Add row to timesheet above the date range display on the timesheet.

add another timesheet row

Select a Project from the drop down list then select a Task. A row for that task will be added to the timesheet. You can now start entering time for the task.  Changes are automatically saved as they are entered.

select task timesheet

timesheet row

Removing a Row

Click the X beside the row that you want to remove. A message will appear asking if you are sure you want to remove the row. Click Yes, remove row. You will not be able to remove rows that have days Pending Review or are Approved.

remove timesheet row

Submitting Time for Approval

Click Submit for approval right below the dashboard. You will see one or more of the following options:

  • This Week – displays when all the days of the week are in a status of not-submitted.
  • This Week and Next Week – displays when all the days of the week and the next week are in a status of Not Submitted.
  • Last Week and This Week – displays when all the days of the week and the previous week are in a status of Not Submitted.
  • Semi-Monthly – displays when all the days between the 1st and 15th or 16th and end of month are in a status of Not Submitted. The first day of the week will determine which period displays. Ex. To approve the 16th through the end of the month, the first day of the week must fall on or after the 16th.
  • Select Days – displays for all the available days that are in a status of Not Submitted.

Select a person to send an email notification or select -no person- to avoid sending an email. Whenever you elect to submit multiple weeks, a pop up will appear displaying a summary of the time for the entire period. A message will appear asking if you are sure you want to submit the timesheet for approval.  Click Yes, submit for approval.

submitoptions

timesheet pending approval

Important: Days and all rows are locked once they are submitted for approval.  A star will be next to the date for each day pending. A user with rights to approve the timesheet will have to deny the days to unlock.

Jumping to a Date

You can quickly jump to date by clicking the calendar icon calendar icon beside the date range of the timesheet.  You can also click Back to go back one week and click Forward to go forward one week.

navigating timesheet

Adding Comments

Type your comment in the comment box then click Add Comment.

adding a comment

Important: Comments cannot be deleted.

Printing Timesheets

Click Print timesheet near the date range of the timesheet. A printer-friendly version of the timesheet will open in a new window so you can print it.

print timesheet