By default, editing of weekly comments are disabled. Administrators can enable editing by clicking Settings then Timesheets from the side menu. Then click Edit beside Allow people to edit weekly comments to change the settings.
Category: Company Settings
Customize Days of Week
Change your weeks to start on any day of the week. Click Settings then Company from the side menu. Then click Edit to edit the company profile. You will see the option to change the Start of Week.
Change Account Owner
Change the Account Owner by clicking Settings then Company from the side menu. Then click Edit to edit the company profile. You will see the option to select a new Account Owner.
Note: Account Owners must be administrators.
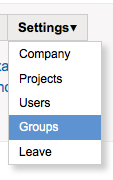
Managing Groups
Groups are a simple way to organize users. You can setup permissions so that a user is allowed to approve time for all the users in one or more groups.
Skip to add, rename, or delete a group.
Adding Groups
Click Settings in the dashboard. Then click Groups. Then click Add Group. Name your new group, select the members, then click Create Group.
Editing Groups
On the line of the group you want to edit, click Edit.

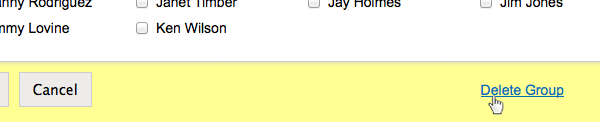
Deleting Groups
On the line of the group you want to edit, click Edit. Then underneath the list of people, click Delete Group. Confirm that you wish to delete by answering Yes.
Configuring leave policies
Leave policies are the rules that govern how users accrue leave. You determine how many hours of a particular leave type users accrue and when the rule will start. The starting point is based on the users’ hire date. You can configure leave to accrue daily, weekly, monthly, or yearly. You can also apply a policy to a single person, multiple people, or all people.
There is also a feature to limit the total amount a user may accrue. And for companies with carry-over limits, you can set the maximum number of hours that a person may carry over into the new year. Annual carryover adjustments are made between midnight and 1:00 am EST on January 3rd to allow time for end of year timesheet approvals. The annual adjustment is based on approved time for the previous year. Negative leave balances are not adjusted. Accruals occur at midnight based on the timezone you set in your company profile.
Important: You must select Track Leave in a users profile to allow them to view their leave balances.
Adding Leave Policies
Click Settings in the dashboard. Then click Leave. Looking at the leave policy section, click Add Leave Policy. Fill in the information then click Save. Assign people to the policy by clicking Assignments beside the leave policy. Select the people and click Save.

Editing Leave Policies
Click the name of the leave policy to make edits.

Delete Leave Policies
Click the name of the leave policy then select Delete this leave policy. Confirm the deletion to remove the policy.

Setting up your company profile
To edit your company’s profile, click Settings. Then click Edit in the header of the company section. Update the information then click Save.

Configuring leave types
There are four customizable leave types: Annual, Sick, Personal, and Comp. You can rename and disable each one.
Edit Leave Types
Click Settings in the dashboard. Then click Leave. Looking at the leave types section, click Edit on the row of the leave type you want to edit. Rename, disable, or enable the leave type then click Save.

Important: You can prevent users from using individual leave types by disabling them. Disabling a leave types does not disable the policy for that leave type. Users will continue to accrue leave according to the policy. You must remove the leave policy separately.